
When displaying hundreds – or even thousands – of chunks, you obviously need to be mindful about the amount of geometry on screen at any given time.
We already saw in the previous article how to improve the meshing and reduce the number of triangles without altering the look of the blocks. However, we can go even further and mesh less blocks than what the chunk actually contains. Note: we already touched on levels of details (LODs) briefly in an early article.
In the image at the top of this article, if you look carefully, you might notice that as the blocks get farther away from the camera, they become bigger. What’s actually happening is that chunks switch to lower levels of details : less blocks, bigger blocks.
Check out this video if you don’t like reading!
Levels of Details (LOD)
There is a good chance you are already familiar with the concept of levels of details in game engines, but if you’re not, here is a simplistic explanation: to reduce the complexity of a scene, assets have multiple versions of their meshes, from high fidelity to low-resolution. The game engine dynamically switches these various representations of the asset based on the current camera view (most often by size on screen in pixels: the smaller an object is on the screen, the lower its mesh resolution).
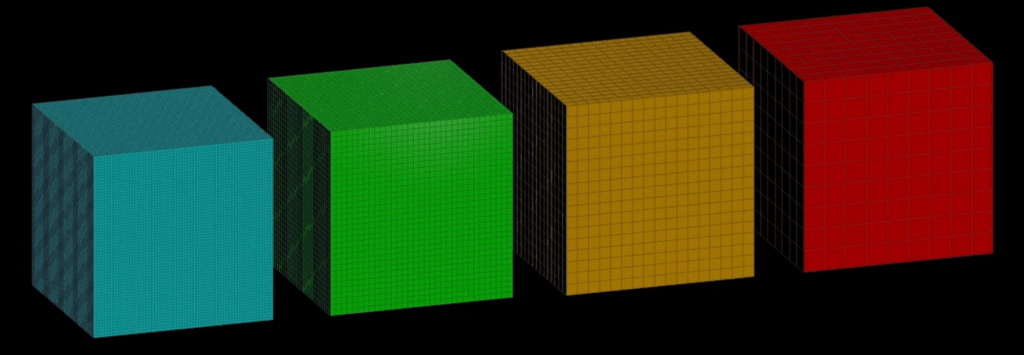
The above is a simple representation of a chunk, from highest detail (left, blue) to lowest (right, red). You can see the amount of blocks the chunk contains gets lower, while the blocks themselves become bigger, all the while maintaining the overall size of the chunk.
It should be relatively simple to adapt your meshing algorithm to deal with a ‘sample value’. If you are using powers of two for your chunk size, the bit shit operators are very handy to select the previous or next LOD size for your chunk:
FullChunkSize >> Sample = SampeldChunkSize
For example:
64 >> 1 = 32
64 >> 2 = 16
64 >> 3 = 8
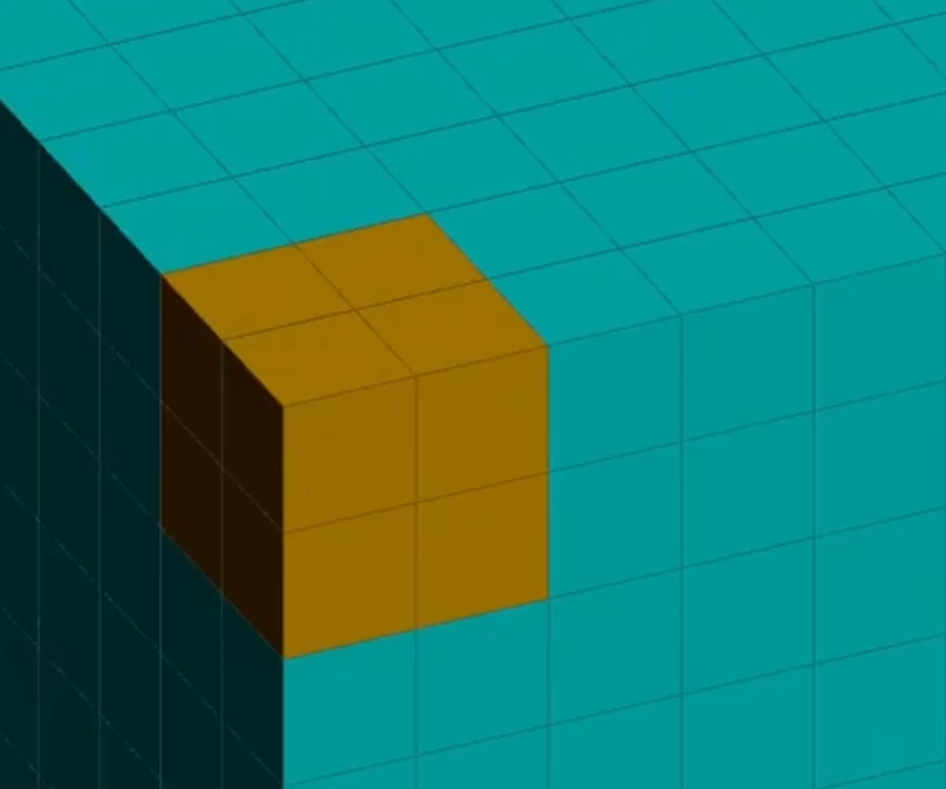
So, for LOD1 (the first lower level of detail after the full chunk), each block will actually represent 8 blocks from the original chunk size:
As for the LOD value itself, check out one of the first articles or the video at the top of this page to see how you can select which LOD to use for which chunks.
Seams and gaps
Along the way of implementing this, you might encounter gaps between chunks (especially where LODs transitions happen), where a block at the chunk border isn’t drawing all the faces it should. This is the nature of undersampling and of using various sizes for adjacent chunks, and you might need to force your meshing algorithm to draw the outside faces of the blocks at the borders of a chunk.
Levels of Generation (LOG)
Undersampling meshes is all well and good, but what if we want to go further?
Indeed, meshing is a very cheap operation, especially if you use the technique presented in the previous article. The slowest part of a chunk lifetime, by far, is the block generation.
We undersampled the meshes, why not also undersample the generation?
This makes sense, for the same reasons we use LODs: the background chunks, because they are so far away and so small on screen, don’t need the same level of fidelity than the chunks directly around the player.
Using the same logic, we can make it so our block generation algorithm works with various sizes, instead of hardcoding a single chunk size.
These lower generation chunks should never be considered for gameplay actions: for example if a chunk has a lower LOG than the original (full) chunk size, we should never try to perform pathfinding on them or try to add / destroy blocks. Until a chunk has been fully generated (with LOG0), it should only be considered as a visual preview, not as a gameplay impacting element.
Combining LODs and LOGs
But now we have a problem. Well, not really. Most problems have solutions.
Because our chunk data can completely change its size (via LOGs), we need to adjust our meshing algorithm (LODs) to account for that.
A chunk with LOG0 (= highest level of generation detail) and a LOD0 (highest level of mesh detail) is the simplest case: no undersampling, either in generation or meshing, needs to occur. This is the most expensive type of chunk to generate and display on screen. The chunks very close to the player will need this level of fidelity.
The same chunk (LOG0) with a slightly lower level of detail (let’s say LOD1) requires undersampling the meshing part only, as discussed previously.
However, a chunk with LOG1 (slight undersampling of generation) and LOD1 cannot use the exact same meshing method as the previous chunk (LOG0 / LOD1), because the meshing algorithm doesn’t have access to the same data.
The solution is simple. To get the final sample value to use during meshing, we need to consider the LOG as the baseline for the sample, but the meshing sample (LOD) might be higher:
MeshSample = Max(1 << LOD, 1 << LOG) / (1 << LOG)
Conclusion
With LODs and LOGs, you should be able to offer very big maps with a relatively cheap cost, because we only fully generate what is close to the player. 90% of the map is undersampled and much cheaper than the full resolution data.
Undersampling in 3D is very powerful. Here is a bit of simple math to help you realize how effective this can be: with a chunk size of 64x64x64 = 262 144 blocks, even just one level of undersampling (divide by 2 in all dimensions) yields 32x32x32 = 32 768 blocks.
Each level of undersampling gives you 8 times less data to deal with.
If this speed and efficiency gets to your head and you end up with multiple thousands of chunks on screen, despite most of these meshes being very lightweight, you will face a draw call bottleneck. Your GPU is going to struggle dealing with that many different mesh objects.
I’ve discussed chunk merging in a previous article, and this is where it comes really handy. We can easily run mutliple chunks in one meshing step. Lower resolution chunks being so cheap, this is very efficient to reduce draw calls.

Leave a comment